There are multiple ways to create and edit reservations in MRM. Reservations may be a single occurrence in a single resource or they may include multiple resources over a series of dates. This chapter details the workflow for creating new single-instance reservations and editing existing ones. We will also cover the process for managing attendees and adding services. We will learn about more complex reservations (multi-resource and recurring) in the next chapter.
A new MRM reservation can begin in one of two places: the Reserve icon in the MRM Task Bar or directly on the Reservation Grid. We will review the process for both options, starting with the Reserve icon.
Option 1 – Selecting Reserve
Select Reserve in the MRM Task Bar. The Reservation Details Form appears. Notice only the General tab displays. This is because a resource has not yet been assigned. Once the resource is selected, all tabs that are available to that resource will display.
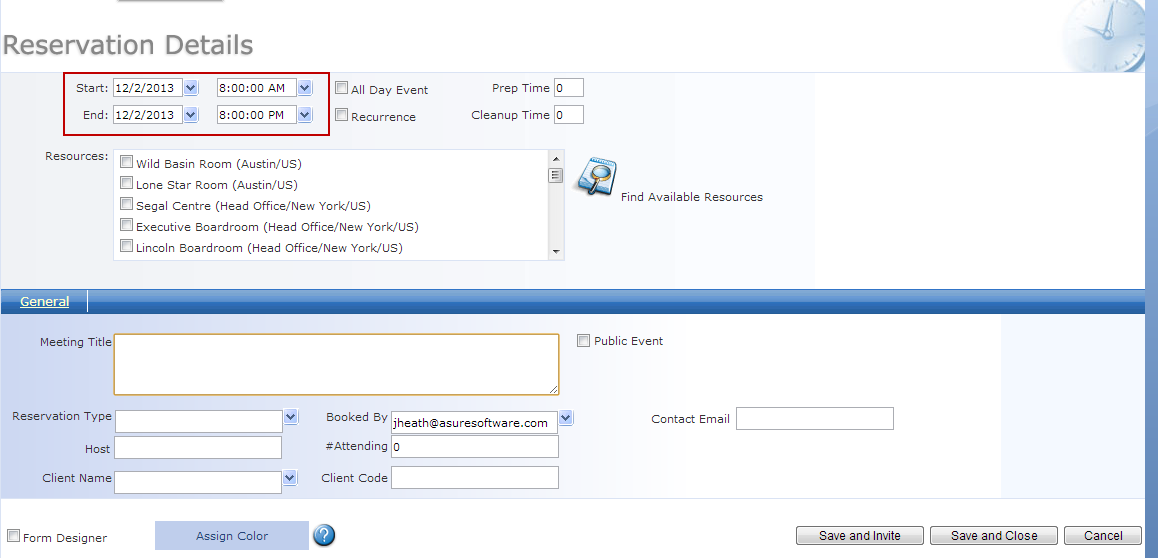
Click the menu button next to the Start and End fields to set the date for your reservation. By default, these dates will populate with the date you were viewing on the Reservation Grid prior to clicking Reserve.
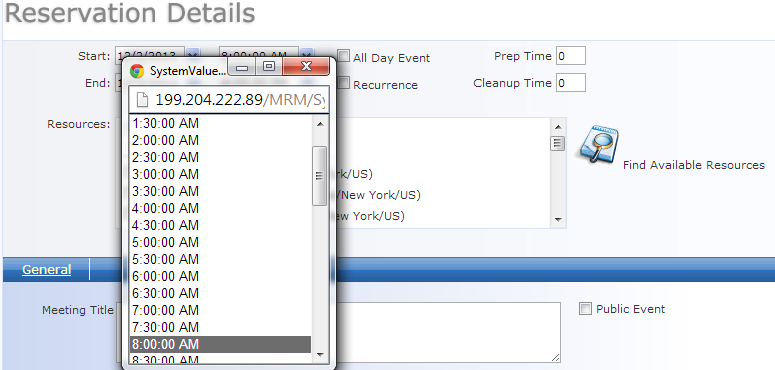
Click the menu buttons to choose a start and end time from the drop down. Be default, this new reservation will display as the business hours for the location you were viewing on the Grid prior to selecting Reserve. The values in this drop down will display in the interval set for your Grid display (60 minutes, 30 minutes, 15 minutes, etc).
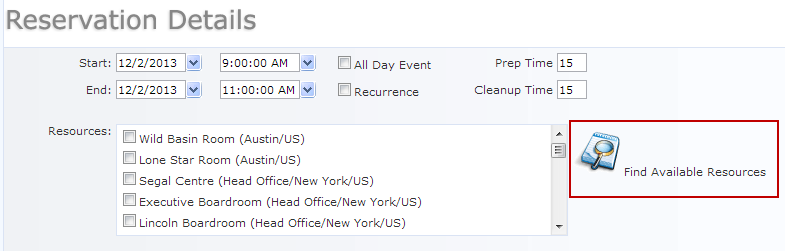
Enter Prep Time and Cleanup Time values
as needed.
To search for a resource that is available for the requested date and time, click the magnifying glass to “Find Available Resources”.
The Find Resources form appears. Note the start and end times, including any prep and cleanup, automatically populate into the form. The Location defaults to the Default Location specified in the active user's User Profile.
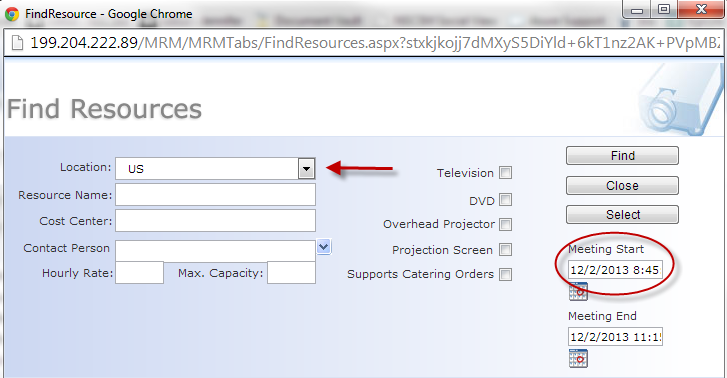
Adjust the location or other parameters as needed and select Find. MRM returns a list of resources that are available at the specified date and time and meet any additional search criteria that was entered on the form. Additional details about the room (such as maximum capacity) may also be visible on this form, depending on your unique configuration.
 You can click
directly on a resource name to navigate to the Resource Details form and
learn more about that particular resource. However, you will
need to close the pop-up and click the back button to return to the Reservation
Details form. A resource will not be selected, so you will have
to repeat step 6.
You can click
directly on a resource name to navigate to the Resource Details form and
learn more about that particular resource. However, you will
need to close the pop-up and click the back button to return to the Reservation
Details form. A resource will not be selected, so you will have
to repeat step 6.

Check the box next to the resource you
want to reserve and click Select
at the top of the form. You are returned to the Reservation
Details Form, and the selected Resource has been added to the Reservation.

Notice the resource has been selected
in the Resources window, and a new tab added to the Reservation Details
form indicating that this resource has been selected. Now
that a resource is assigned, all tabs that are available to the selected
location will display.
Enter all pertinent reservation details. If
any fields have been set to mandatory in the Form Designer, MRM will
prompt you to complete those fields if you attempt to Save and Close
without completing them.
For this example,
we will only complete details on the General Tab. When
finished, Save and Close.
When the save process is complete, you will be returned to the Reservation Grid and the new reservation will display. If a reservation type was assigned, the reservation will display in the appropriate color, and it will display as either tentative or confirmed depending on your workflow settings. The meeting title and other details will also show depending on the options configured in the User Interface section of the Admin Console.

Option 2 – Double-clicking on the Reservation Grid
You can preview resource availability by navigating to the desired date and time on the Reservation Grid. Use the calendar to select a new date and then use the scroll bar as needed to find the desired time. Users also have the option of clicking directly on the Resource Name in the Reservation Grid to access the Resource Details form and learn more about a particular resource.
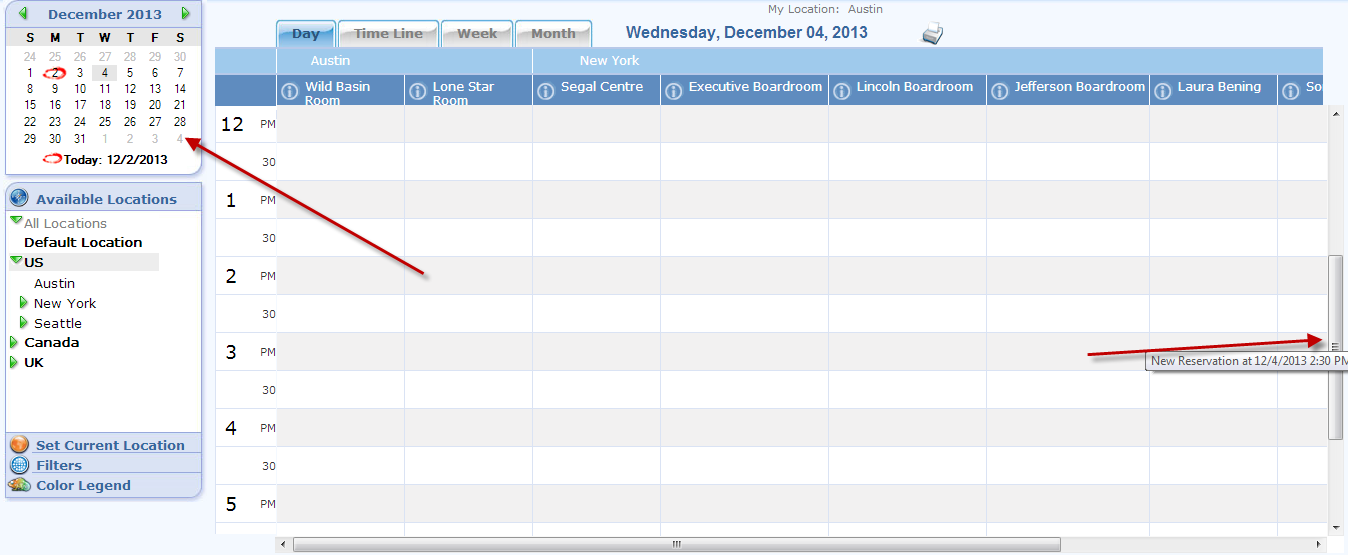
 On the MRM Calendar, today’s date will always be circled in red, while
the selected date will be highlighted in gray. It is easy to
notice the red circle and assume you are looking at today’s date on the
calendar. The selected date is also listed at the top of the
grid. In this example, today’s date is December 2, but the
selected date is December 4.
On the MRM Calendar, today’s date will always be circled in red, while
the selected date will be highlighted in gray. It is easy to
notice the red circle and assume you are looking at today’s date on the
calendar. The selected date is also listed at the top of the
grid. In this example, today’s date is December 2, but the
selected date is December 4.
When you have confirmed the resource availability for the desired date and time, simply double click in the starting cell block on the grid to launch the Reservation Details form.
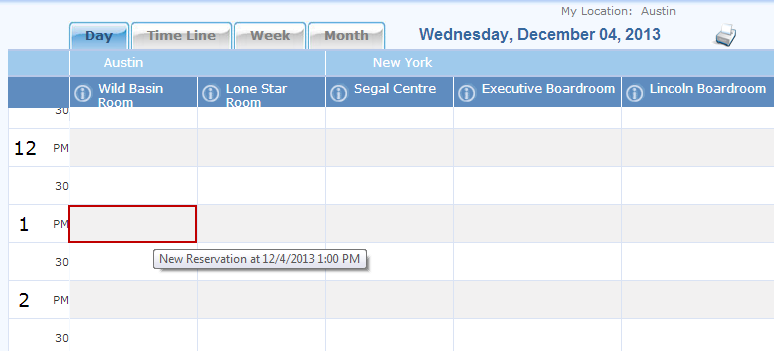
The Reservation Details form appears and the date, start time and selected resource are pre-populated.
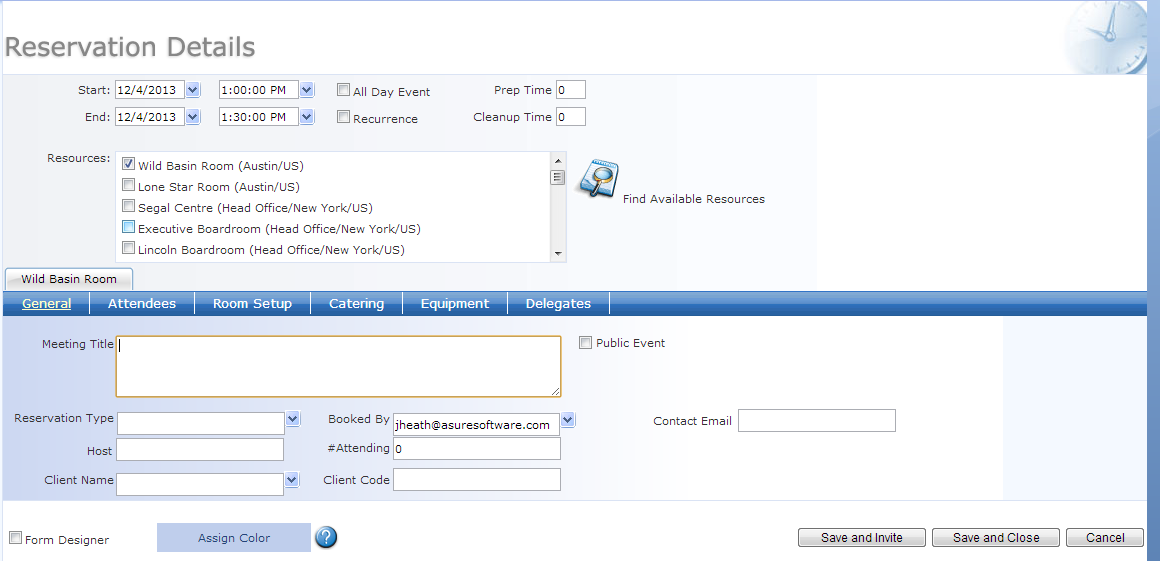
Adjust the
end time as needed. This new reservation will default to the
interval set on your Reservation Grid. In this example,
the interval is 30 minutes.
Enter Prep
and Cleanup time, if needed, and complete all other Reservation Details.
Save and Close. The new reservation displays on the Reservation Grid.
|
|
We are interested in hearing from you about our products. Visit our customer support portal. Written for Meeting Room Manager 10.0, March 2014, Copyright © 2014 Asure Software Inc. |